Recover Data From Android Phone (Broken/SD Card)
User Guide
How to Install?
Step 1
First of all, Get Android Data Recovery Tool, but before downloading & installing it on your PC ensure that your computer is connected to a stable network connection. Then you will be asked "Do you want to allow this app to make changes to your device", click on Yes.Step 2
Hit the Next option. Then, on the License Agreement screen, select I accept the agreement option and follow the installation wizard to install the tool into your PC.
Step 3
Once the installation process gets over, the Completing the Stellar Data Recovery for Android Setup Wizard window displays. Tap Finish.
How To Retrieve Lost/Deleted Data From Android Devices?
Step 1 - Choose What to Recover
Once the "Android Data Recovery" software is successfully installed on your PC, then launch it.You'll get the interface like shown-below. This tool can retrieve 7 data types such as photos, videos, audio, messages, contacts, call history, and documents from Android devices.
All you need to do is to just choose the file type that you want to recover and click on "Next" button to continue.

Step 2 - Connect Android Phone/Tablet to a PC using USB Cable
Now, you'll get a screen prompting "Connect Your Device". Use a USB cable to connect your Android phone and PC.
Please Note:: If you have connected your Android device to PC for the first time, your PC will install the USB Drivers for your Android device automatically even without internet.
Then, your device will display USB connection prompt, select Transfer Files option in it. Ensure that the USB Debugging is enabled on your phone.

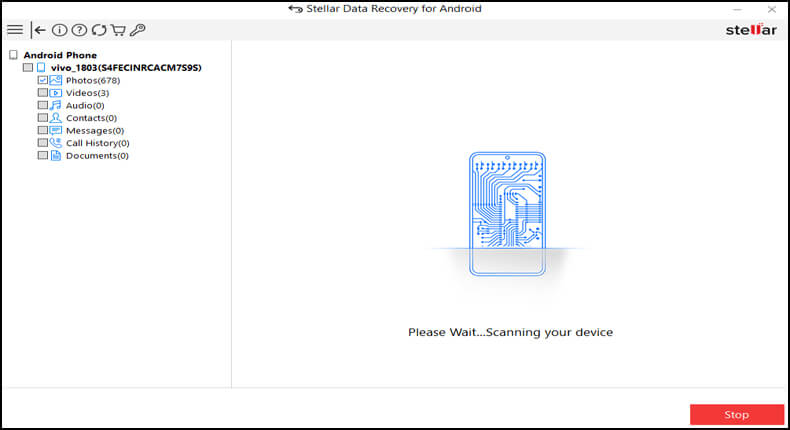
Step 3 - Scan Your Android Device for Lost Data
Once your Android device gets detected, its brand model will appear on your PC screen as shown below. Click on Scan button.
On the "Allow Access Permissions" dialog screen, select Allow and also grant the prompted permissions to the Stellar Data Recovery for Android on your phone to allow access to your data.

Wait patiently until the process gets over.
Step 4 - Preview & Choose the "Scanned Data"
Once the scanning process is completed, tap OK. Now, the scanned data will appear on the screen in categories. Select the data type from the left panel to preview.
Choose the data that you want to recover and click the Save button and select the destination to save the selected items.
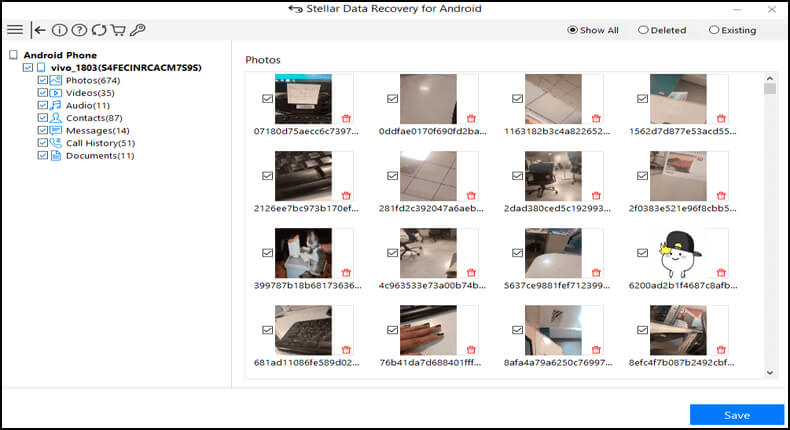
Hit OK to save files. When done, check the recovered data in the destination location.
For detailed information, refer this link.
How to Uninstall?
Step 1
Go to "Start" menu on your Windows 11 PC.
Step 2
Search for "Control Panel" in a search bar and click on the result.
Step 3
Now, click on "Uninstall a Program" in Programs.
Step 4
Scroll down & find "Stellar Data Recovery for Android" and right tap on it. Click on "Uninstall" to uninstall the tool.