Rooting of Android devices has several benefits, right?
But many users don’t even understand the need of rooting their phones. Though there are millions of Android phone users in the world but users don’t get every feature that are required.
To overcome this, rooting is done so that users can unlock several other features on phone even those which are not compatible with the OS. After rooting the phone, user can install carrier free apps, improve battery performance and speed, etc.
But sometimes, this rooting leads to several issues as well and before doing, remember this it’s a risky process. First of all, the rooting will tamper the warranty of your phone.
Therefore, you need the right tool to root your device and one common rooting tool is Odin Root. We will discuss about this in this complete and will know how to use Odin to root Android phone.
What is Odin Root?
Odin Root is a tool to root Android devices especially Samsung phones that allow users to access their phone according to their use. This is used for both phones and tablets to install custom ROMs. Using this tool, any Android user who thinks that they need some other features on their phone is possible by only one click to this tool.
You can download this Odin Root tool from official website. This tool has high success rate of rooting Samsung Android phones and is free to use.
What’s The Before Process To Root Samsung With Odin?
Well, before you root your device with Odin Root, you should know few important things. Its always a mistake to root device in hurry. So be relax and follow the below tips that I assist you to root Samsung phone using Odin Root tool.
- The very first thing that you should do is to create a backup of every data from phone before rooting. As using this tool don’t backup data automatically from phone.
- Make sure USB driver is installed on your Samsung phone.
- Remember to charge your phone to 60% at least
- Enable USB debugging option on your phone by simply going to Settings > Developer Options or for new devices, go to Settings > About Phone > Build Number and click multiple times to enable Developer option
How To Use Odin Root To Root Samsung Phone?
Now follow the below steps as guided to root Samsung with Odin. They are:
- First, look for build number on your phone
- Then Download CF Auto Root Package, the extract it and save them on your phone.

- After extracting, right click on “Open as Administrator”

- Now switch off your Samsung phone in download mode by simply pressing Home, Power, and Volume down. It may vary depending on devices but most of them has the same process

- After this, connect your device to PC/laptop via USB cable
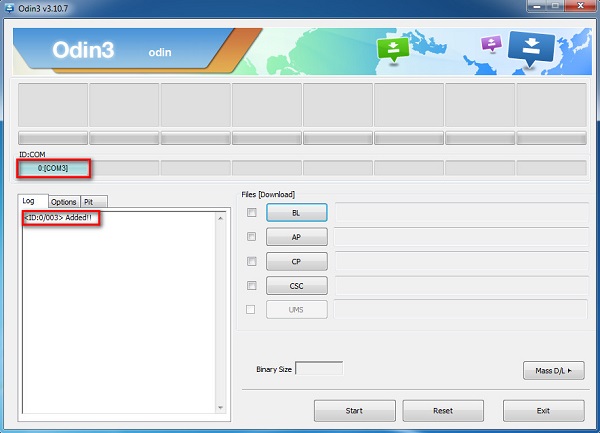
- Then go to that location where CF Auto Root file is extracted and choose executable file of Odin. You will see “Added” message in window and light blue box will be seen at ID: COM showing “COM:3”.
- Now tap on PDA or AP (depends on Odin version) and open .tar.md5 file from Auto Root package location

- When files are added, tap on “Start” button for the rooting process to begin

- After everything is finished, you will see green box saying “Pass” or “Reset”. And now you can unplug your phone and reboot it.

What To Do When Root With Odin Fails?
You may encounter failure of this process but there is nothing to worry. You should do the below mentioned steps:
- Restart your computer and install USB driver and again try to connect
- Restart your Samsung phone once
- Update your phone OS to latest
- Try to run Odin as Administrator
- Use some different USB cable
- Once again download the firmware package and remember it should be as per your phone model
How To Check Root Status On Samsung Phone
It’s very important to see whether the root of your device was successful or not, but how?
Remember that after the successful rooting on Samsung Android phone, SuperSu app will be seen on phone screen and this means rooting was done properly. In fact, you can also check the status of root by the use of Root Checker app.
Best Alternative To Root Samsung Phone Without Odin Root
It may happen that rooting of Android phone may not be successful with Odin Root tool. But there is nothing to get depressed as there is yet an alternative and effective method to root your device. Android Root is one of the best and useful software that helps to root Android phone with one click.
It is compatible with Samsung phone and almost 7000 other Android devices. This tool is hassle free to use and after successfully rooting your phone via this tool, you can modify OS and pre-installed apps and other things.
So without any worry, simply Download Android Root software and root Samsung Android phones and tablets with ease.
 btn_img
Note: It is recommended to download and use the software on your PC or laptop. It is because recovery of phone data on the phone itself is risky as you may end up losing all your data because of data overriding.
Steps To Follow To Root Android Phone Using Android Root
Step 1: Connect Your Android Phone To Computer
First of all install and download Android Root software on your computer and launch it. Click on “Root” among the available module.

Next connect your Android phone to computer with the help of USB cable. If your Phone is running on Android 4.2.2 or above version, then you will get a pop-up notification on your phone. Simply tap on “OK” to allow USB debugging. After that the software will automatically detect your Android phone.

Step 2: Root Your Android Phone
Once your phone get detected and connected, click on “Start” to begin the process.
The software will then start to detect your phone and discover a proper way to root your phone. The detecting process may take few minutes depending upon the different phone models.

Once the detecting process gets complete, the software will be ready to root your Android phone. Click on “Root Now” to start rooting your phone.

During the process the rooting, your phone will pop-up a message asking you whether you want to root your phone or not? Tap on “Confirm” to continue rooting. In just few minutes of time, your phone will get rooted successfully.

FAQ (Frequently Asked Questions)
How Long Does Odin Take To Flash?
Generally, the entire process takes 10 to 12 minutes. What you have to do is tap on “Start” button at bottom of Odin app. After that, the flashing will begin and almost take 10-12 minutes. You device will reboot after that and it will take some time.
How Do I Fix Odin Mode?
It’s very easy to fix Samsung stuck on Odin Mode, just you need to follow the below ways. They are:
- Force restart your Samsung phone by pressing Power + Home + Volume Up + Volume Down unless the phone reboots
- Remove battery from phone if possible
- Use Odin flash tool
Does Flashing Wipe Data?
Yes, there is a chance to lose all your data stored on phone. This process performs factory reset and all data are wiped away. When you are flashing different ROM than you already have then you should clear data and cache and this performs factory reset, hence all data are erased.
Conclusion
Well, many Android phone users want to root their phone but they actually don’t know how to do it successfully. Generally root with Odin mode is a new way to root Samsung phones without any hassle. In this blog, I have tied to show how to root Samsung with Odin Root tool.
And hope that following this will allow to root your device successfully. In addition, an alternative tool is also recommended that helps you to root any Android phone with ease.
James Leak is a technology expert and lives in New York. Previously, he was working on Symbian OS and was trying to solve many issues related to it. From childhood, he was very much interested in technology field and loves to write blogs related to Android and other OS. So he maintained that and currently, James is working for androiddata-recovery.com where he contribute several articles about errors/issues or data loss situation related to Android. He keeps daily updates on news or rumors or what is happening in this new technology world. Apart from blogging, he loves to travel, play games and reading books.