Did you encounter an error message “SuperUser Error Android Gaining Root Access Failed” or “SuperUser Installed, No Root Access” after rooting your Android device?
The same situation I have faced once and it was really worrying for me. But later on I managed to fix the error and how, I will discuss it below.
Most of the Android users love to root their device because it gives super access and lots of freedoms. But when something goes wrong then this freedom seems to inject from every way to user and they think why I have opted to root the device.
Many users try to root their device via several apps and SuperUser/SuperSU is one of them. After installing this app to root the device, sometimes it throws an error message that it fails to get root permission.
Most of the time, it’s the app issue and this means that the root process is incomplete. So what to do when you get an error message “SuperUser Error Android Gaining Root Access Failed” or “SuperUser Installed, No Root Access“?
Don’t worry, read this blog completely and you will get a complete guide on how to fix the issue above mentioned.
Practical scenario
Superuser installed, No Root Access
Hello androidcentral members,
It seems that I accidentally changed the ownership of the su file to “system, sdcard_rw” and now I have no way to change it back to “root, root”. Everything was working fine beforehand. Any suggestions on how to fix the su file? I have already attempted to reroot using the same way I originally rooted the device with no luck.
Thanks!
What is SuperUser/SuperSU Root?
Super User is one of the popular app developed by Android developer Chainfire. It allows advanced management of superuser access on rooted device. However, rooting is done via two methods- first is by Android Application Package(APK) that you will get from 3rd party rooting service and second one is manually granting access to root which is done through recovery mode.
Why Users Want To Root Their Phone
Rooting allow Android users to optimize, tweak and customize the device completely. It means that after rooting, your device will work as you want it to work and importantly, manufacturer’s warranty will be lost.
But still people root their device because they get more benefits instead of not rooted phones. Remember that rooting should be done properly and accurately otherwise it creates lots of problem.
However, different OEMs have different rooting and can be achieved via automated script, installing a flashable root package, by flashing pre-rooted ROM or by custom recovery.
Reasons Why you Fail to Root an Android Phone
As told earlier that if rooting is not done in proper way then it can create lots of trouble for user. You should know what the reasons for rooting failed on Android phone are.
Reason 1: Rooting version fails to match phone model
It is obvious that rooting tool may not be compatible with your phone model and this may give an error message. So before opting any tool for rooting your Android phone, just ensure whether the tool is best for your device or not.
Reason 2: Recovery mode
Some rooting tool that you download on your phone may ask you to flash the entire device in recovery mode. In such situation, its impossible to root your device.
Reason 3: Different root package
After you download root tool, it may give you challenge as well. This is because most of the Android phone support OTA or ICS update through which new software are delivered.
Reason 4: Bad internet connection
While rooting your device, stable internet connection is must. If sometimes, the network fluctuates then it may stop the rooting process

Reason 5: Phone driver
Sometimes, there is a need to connect your phone to PC while rooting your device. But before this, you should ensure that all the necessary drivers are installed on computer for your phone otherwise rooting process will not go smoothly.
Reason 6: Battery is low
Make sure your phones battery is charged completely as many tool require high battery for rooting. So, low battery can stop you from rooting your phone.
How to Manage Root Permissions With SuperUser App
After successfully rooting your Android phone with SuperSu app, your phone will reboot and an icon of this app will be in your drawer. It has full control over other apps those who want to get root permission.
If any app request for root permission then first SuperSu app has grant it. When you tap on Grant and receive a message successfully, it means that rooting is done successfully on your phone.
If you want to check whether the root is working or not, simply download Root Checker app and verify the status. Even you can also download the app that you wanted to install from long time after rooting your phone.

However, if you can manage root permission by opening the app drawer and then click on SuperUser icon. There a list of apps will be available those are granted or denied access from SuperUser. If you want to change its permission then click on the app.
How To Use SuperUser On Android Phone And Gain Root Access
The SuperUser/SuperSu app is available on Play Store but sometimes it don’t give access to it. So you can click on this link and can get the latest version of SuperSu. This is also in .zip format so you can simply download it on your computer, connect your phone to USB cable and simply drag the SuperUser zip on your phone internal memory.
Now reboot your device into TWRP recovery, you can get it from TWRP site. After it is installed, now your phone is ready to gain root access.
Now follow the below steps on how to root Android phone.
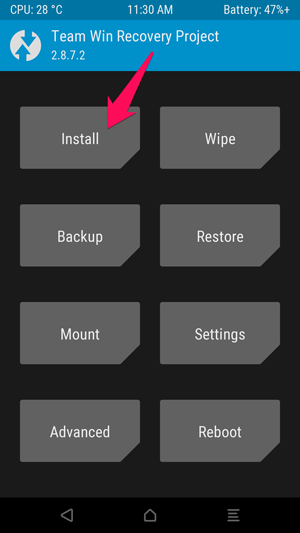
- Now enter “Recovery Mode” and then you will be on TWRP home screen. Simply tap on Install button
- Then as you can see the image below will appear. Move down and click on SuperSu ZIP file

- After that, you will come with the below screen, swipe to confirm flash

- This will take some time and soon you will get “Wipe cache/Dalvik” option on screen

- Then, click on “Reboot System” to again boot back into Android.
But after this, many users have reported that they have come through the error message that really frustrate them as gaining root accessed failed from SuperUser.
So let us read further and know what are the ways to solve such error.
How To Fix SuperUser Error Android Gaining Root Access Failed
Now here come the solutions that will help you to solve SuperUser error gaining root access failed. Go through them and hopefully, you will able able to fix the error.
Now follow the below steps if you are facing the above error after rooting your phone.
Step 1: Open SuperSu and update the app when prompts you for this

Step 2: May be the issue is related to any app and other apps work fine then its because you have not accepted the rooting permission of that particular app. Its simple to fix by going to Settings >Application > All > SuperSu and then click on it. Now clear app data > open app in question and grant permission when poped up.
Step 3: Open the app from drawer and then go to Settings > try to disable and enable it. After that, reboot your device and try to use the apps. If it still shows error then move ahead for better solutions.
Step 4: Open SuperSu > Settings and click on Reinstall option > choose Continue

Step 5: When your phone don’t have TWRP installed then below solutions can help you:
- First, download Chainfire’s SuperSu flashable zip file: UPDATE-SuperSU-vx.xx.zip
- Then unzip the file and go to extracted folder
- There, you can see “Common” folder and open it

- Now copy apk on device and install it. After that, use a root app to check if the issue was resolved or not
After following the above steps, if you still face the same error on your Android phone then you should search for a proper root exploit and again try to root your phone.
Video Guide:
source: iTechKnow
Bonus Tip: Best Way To Root Your Android Phone Without Any Error
If you want to root your Android phone without any issue then you can use a professional tool named as Android Root. This is one of the popular programs that easily root Android phone and tablets without having any knowledge.
It is easy to use and compatible with almost every android phones. It works by simply one click and can make your phone as you want. It’s completely safe and secure.
 btn_img
Note: It is recommended to download and use the software on your PC or laptop. It is because recovery of phone data on the phone itself is risky as you may end up losing all your data because of data overriding.
Conclusion
Many users root their Android device using several rooting tool from play store just to gain access without any interruption. But sometimes, the thing does not work accordingly and goes wrong, hence an error popups.
In this blog, rooting Android phone with SuperUser/SuperSu tool failed to gain access and how to fix is explained along with other details. I hope the solutions will work for you and you can easily gain root access on your Android phone using SuperUser tool.
James Leak is a technology expert and lives in New York. Previously, he was working on Symbian OS and was trying to solve many issues related to it. From childhood, he was very much interested in technology field and loves to write blogs related to Android and other OS. So he maintained that and currently, James is working for androiddata-recovery.com where he contribute several articles about errors/issues or data loss situation related to Android. He keeps daily updates on news or rumors or what is happening in this new technology world. Apart from blogging, he loves to travel, play games and reading books.