The error ‘App integrity check failed your device is not authorized’ typically occurs on Android devices when there are issues related to system integrity, software updates, or device security settings. In this blog, I will discuss why this error actually triggers and how to solve it with less effort.

So, let’s get started…
To fix Android-related issues, we recommend this tool:
This effective tool can fix Android issues such as boot loop, black screen, bricked Android, etc. in no time. Just follow these 3 easy steps:
- Download this Android System Repair tool (for PC only) rated Excellent on Trustpilot.
- Launch the program and select brand, name, model, country/region, and carrier & click Next.
- Follow the on-screen instructions & wait for repair process to complete.
Common Reasons for App Integrity Check Failed Error
Here are the common causes for occurrences of this error message:
- Installing applications from unofficial sources can cause this error.
- If your phone is rooted or jailbroken, the application may block access due to security concerns.
- Corrupted app files
- Outdated operating system
- Security Policies from the Developer
How to Fix Error App Integrity Check Failed Your Device Is Not Authorized?
Follow the below tweaks to troubleshoot device integrity check failed Android.
Method 1- Use Android Repair Tool
Encountering errors and issues related to Android is common, in such situations, you can use Android Repair Tool. This software can fix any problems including app integrity check failed your device is not authorised error in no time with the least effort.
Furthermore, this featured-loaded is easy to install & works with simple clicks. Therefore, just download this tool on your PC & follow the instructions in this link.

Note: It is recommended to download and use the software on your PC or laptop only.
Method 2- Update Your OS
Using an outdated version of Android OS can trigger this annoying message. All you need to do is to update your device OS and ensure to use the latest OS.
Here’s how you can do so:
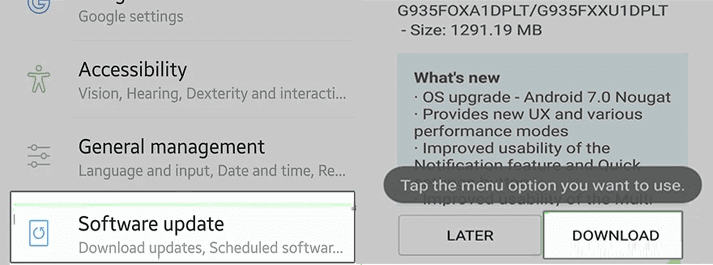
- Go to the Settings app on your Android.
- Tap on the Software update
- Check here if any update is available.
- If any are found, tap Download button to install the latest version.
Also Read: Android Update Failed to Install: Get Expert Insights to Fix It
Method 3- Uninstalling Incompatible Applications
Sometimes, any 3rd-party application installed on your mobile can lead to a device integrity check failed Android. Therefore, you need to boot your phone into Safe mode & check for any problematic app & uninstall it.
Follow the below steps to do so:
- Long press on your Power
- Then, hold a Power off option and tap on Safe Mode & confirm the same.
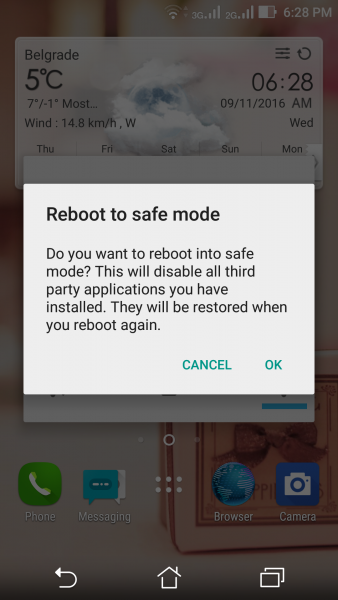
- Once you’re in Safe Mode, you can check for a problematic app & uninstall it.
Method 4- Clearing Cache Partition in Recovery Mode
The next solution you can try to tackle this situation is clearing the cache partition in the recovery mode. Many users have found this trick useful in their cases. Running your device in the recovery mode works well when the issue is service-related.
Follow the below instructions carefully:
- Initially, ensure to turn off your device.
- Next, press & hold a Volume up button along with a Home button for sometime
- After this, press a Power button unless you get the “Recovery Booting” option on your screen.
- Then, using a Volume Up/Down button, choose Wipe cache partition tapping a Power.
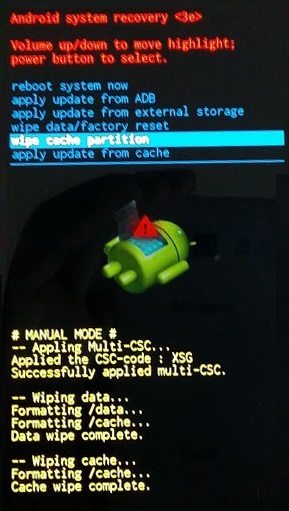
- Lastly, select Reboot system now.

Method 5- How to Fix App Integrity Check Failed Your Device Is Not Authorised Error by Disabling Developer Mode?
If your smartphone has developer mode turned ON, turning it off might fix the error message. Navigate to your settings & disable it.
Method 6- Reset Network Settings
Resetting networks can eventually help you to fix this annoying error. So, do it as soon as you can and resolve the problem.
Follow the steps below:
- Navigate to Settings app on your phone.
- After this, scroll down & choose Additional Settings

- Select Back up and reset
- Choose Reset Phone >>Reset network settings options.
- Now, confirm the reset process by providing the phone password.
And you are done!
Related FAQs:
What Does Device Integrity Failed Mean?
Device integrity failed simply means that your device doesn’t meet the requirements for the particular app.
How to Fix Device Integrity Check Failed on Android?
To fix the device integrity check failed on Android, try these tricks:
- Restart your device.
- Update the operating system.
- Clear cache partition.
- Factory data reset.
How Do I Enable Integrity on My Apps?
To enable integrity on apps, follow these steps:
- Open the Play Console >> Go to the App integrity page.
- Next, tap on the ‘Store listing visibility’ section.
- Select whether you need to enable integrity checks for your Google Play Store listing.
- Now, save the changes.
Also Read: Fixed: System UI Not Responding With 7 Fixes
Final Thoughts
So, this is all about the error app integrity check failed your device is not authorized.
Nevertheless, if none of the above resolutions resolve the error, it may specify a more serious hardware/firmware issue. In such situations, contacting the device manufacturer or visiting an authorized service center for help is recommended.
Moreover, for further assistance, contact us on Twitter or Facebook.

James Leak is a technology expert and lives in New York. Previously, he was working on Symbian OS and was trying to solve many issues related to it. From childhood, he was very much interested in technology field and loves to write blogs related to Android and other OS. So he maintained that and currently, James is working for androiddata-recovery.com where he contribute several articles about errors/issues or data loss situation related to Android. He keeps daily updates on news or rumors or what is happening in this new technology world. Apart from blogging, he loves to travel, play games and reading books.