The Verizon Provisioning error occurs when there is an issue with your device such as a corrupt operating system or network settings. The users face this problem while activating a new phone but not receiving messages. So, if you are facing the same problem, restarting your phone, reinserting your SIM card, or enabling and disabling your cellular data are some of the fixes that you can try to fix the issue. However, read this complete guide to know more fixes in detail.
In this article, we have covered all the possible solutions that will help you to resolve this problem easily. But before going for the fixes, have a quick look through the causes that trigger such a problem in the first place.
To fix any Android related issues, we recommend this tool:
This effective tool can fix Android issues such as boot loop, black screen, bricked Android, etc. in no time. Just follow these 3 easy steps:
- Download this Android System Repair tool (for PC only) rated Excellent on Trustpilot.
- Launch the program and select brand, name, model, country/region, and carrier & click Next.
- Follow the on-screen instructions & wait for repair process to complete.
What Does “Provisioning Error” Means on Verizon?
It means your existing plan doesn’t support the High-Definition video option. But the HD videos are playing as you have the feature code provisioned on your account. So, when situations are found or identified by the system or the provisioned feature code doesn’t match, it flashes you this error.
How to Fix Verizon Provisioning Error?
Follow the below solutions one after another as instructed to fix the provisioning error on Verizon.
Solution 1: Reboot your Android Phone
Your phone’s internal issues can trigger such a problem therefore we here suggest you reboot your phone once to fix Verizon Provisioning error.
Follow the below steps to reboot your phone:
- Long press the Power button of your phone.
- Select the Restart option.
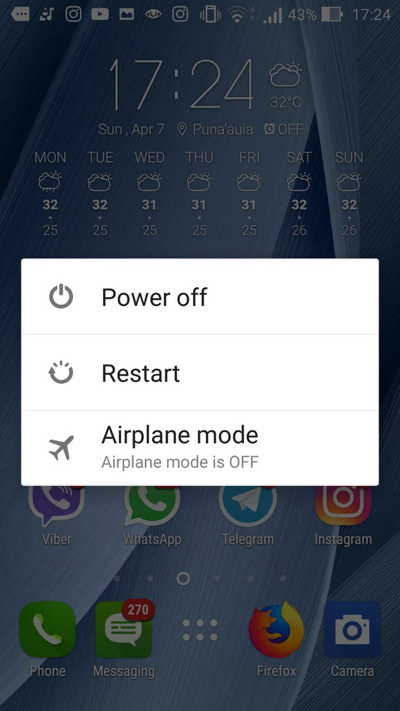
- Wait for your phone to restart.
Also, you can use our best and professional Android Repair tool to fix the issues on your Android device.
The tool has the capability to resolve any Android-related issues with ease. It is easy to use and can solve any Android errors like Stuck on boot loop, Black screen of death, Apps keep crashing, and several others. You need to simply download the software on your system and follow its user manual to use it.

Note: It is recommended to download and use the software on your PC or laptop only.
Solution 2: Reinsert the SIM Card
If after restarting the phone the problem doesn’t solve, try reinserting your SIM card. This will mostly clear the provisioning error on Verizon.
Here are the steps to do so:
- Switch off your phone and take out the SIM card.
- Now, turn on your phone and wait for a few minutes.
- Then, turn it off again and place the SIM card properly in the slot.

- Next, Power on your device and check if the problem is fixed.
Solution 3: Disable/Enable the Cellular Data Option Features
Another reason causing the problem is the wrong or corrupt configuration of cellular data options on your phone. In such a case, we would suggest you disable/enable the features of the cellular data option to escape the Verizon Provisioning error on Android. For this, you need to follow the below instructions as guided:
- Open your phone’s Settings application.
- Go to the Mobile Network section.
- On the next screen, enable or disable each option.

- Once done, exit the Settings app and check for the issue.
Solution 4: Switch to Another Wi-Fi Network Connection
If you are using Verizon One Talk and getting provisioning error, it must be because of your ISP. In such a situation, switching to another Wi-Fi will help you get rid of the error issue.
For this, you need to Disconnect from the current Wi-Fi network. Then, scan for another Wi-Fi connection and connect it. Once connected, open the Verizon One Talk and check if the error issue is fixed.
Solution 5: Remove the Unused Devices from Messages+
Well, Verizon has a limit of 5 devices to connect at a time. However, if you are trying to connect more than 5 devices, you are going to have trouble with this error on Verizon. So, here you can try clearing the extra devices from your account to resolve the error problem.
Follow the steps as instructed to clear the additional or unused connected devices from your account:
- Open any browser on your phone and launch the Verizon website.
- Click on the My Verizon section and choose the My Devices option.
- Next, head to the option Manage Connected Devices and select Manage Message+ Devices.
- Now, tap the Disconnect option next to each connected device.
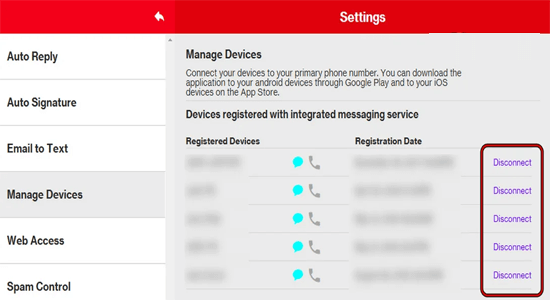
- Once done, relaunch the app and see if the error issue has been solved.
Solution 6: Update the Messages+ Application
Another possible reason triggering such an error issue on the Verizon is outdated Messages+ app version. So, in case encounter such an error, particularly on the app, try updating the app. This will install the latest version that includes the patches which can solve such errors or issues on the app.
Update the app by following the below steps:
- Go to the Google Play Store app on your phone.
- Next, click on the Profile icon at the top right corner.
- Select the Manage apps and device option.

- Now, head to the Updates section and look for the Messages+ app.
- If any update is found, tap the Update button next to the app and wait for the latest build to install.
- Once done, check for the issue.
Solution 7: Turn On the CDMA-Less Provisioning on Verizon Website
One of the primary reasons occurring provisioning error on Verizon is missing CDMA radio on your phone. This will not let the messages to receive on your phone and hence you get this error. However, you can activate CDMA-less on your phone. You just need to follow the below steps:
- Open the Settings application on your phone.
- Next, click on About phone.
- Then, copy the IMEI2 number under the Available SIM.
- Next, go to the Messages app and head to its More Settings option.
- Select Chat Features and toggle off the button for Enable chat features.

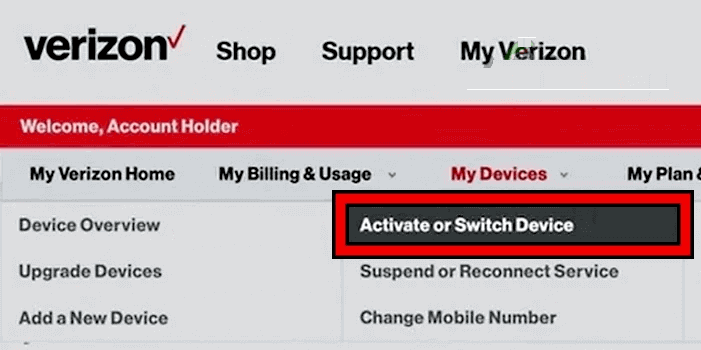
- Now, open any browser and go to the Verizon website.
- Go to the Accounts section and click on the My Devices
- Next, choose Activate or switch device option followed by Activate on an Existing Line.
- Choose the line and paste the IMEI2 number.
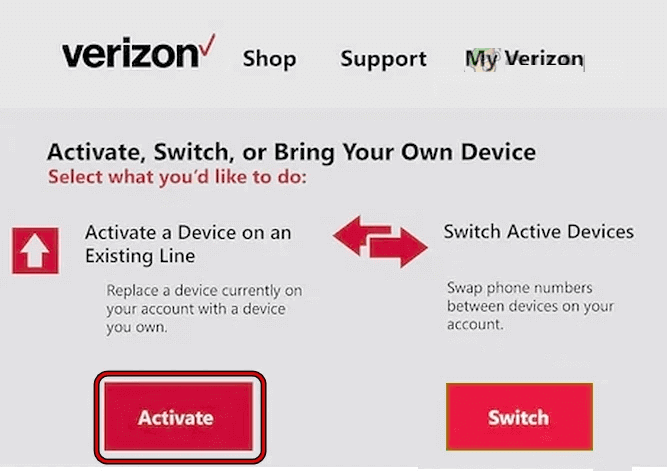
- Now, follow the on-screen prompts to finish the activation process.
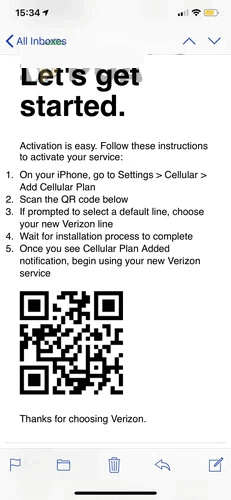
- Turn off your old phone and Power on your new device.
- Re-establish the Wi-Fi connection and connect the phone to it to activate the Verizon eSIM.
- Next, check your email inbox for the QR code to activate eSIM.
Solution 8: Remove the Conflicting Latest Messages+ Update
At times, the latest update can also conflict if it is not compatible with your device’s software. Therefore, we here suggest you remove the conflicting update to clear the Verizon provisioning error.
Follow the instructed steps to remove the latest update:
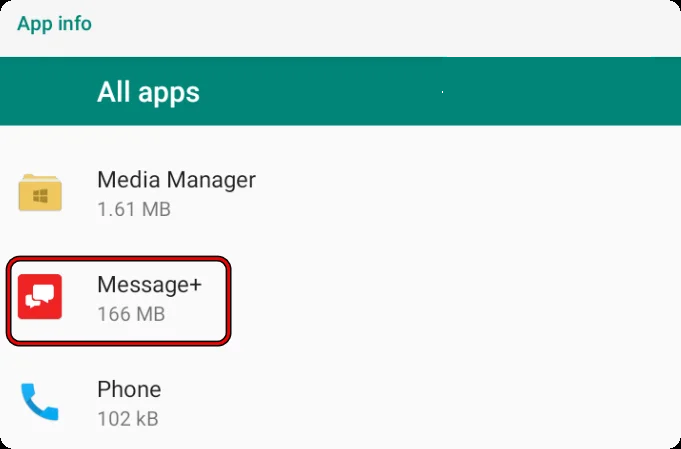
- Open the Settings application on your phone.
- Then, select Apps or Application Management.
- Scroll through the app list and select Message+.
- Now, tap the three dots at the top-right side of the screen and select Uninstall Updates.
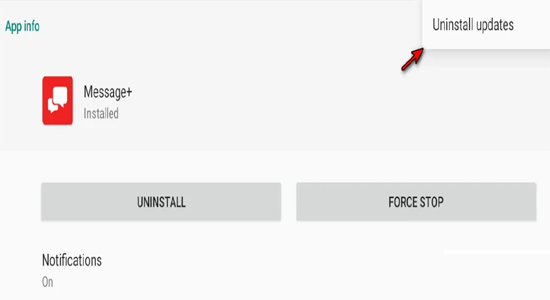
- Confirm to remove the update.
- Once uninstalled, reboot your Android device and see if the provisioning error on Verizon is cleared.
Solution 9: Reconfigure the Network Settings
If the network settings on your phone is not properly configured, it may result in this error. Here, you need to reconfigure the network setting to clear the error issue. But before performing this solution, make sure to prepare the backup of your Android device as performing this solution will lead you to data loss. However, you can use Android Data Backup & Restore tool to create a complete backup of your device data and restore it after resetting.
This tool is the World’s best-recommended backup and restores tool for android devices. The tool allows you to have a complete backup of android devices along with restoration of the backed-up data anytime.
Android Data Backup & Restore tool is 100% safe and secure to use and has a user-friendly interface that makes it easy to use for anyone without any technical help. You just need to download the software and follow its user-guide to back up your device data.
btn_img
Note: It is recommended to download and use the software on your PC or laptop only.
Once you have backed up your device, follow the instructions below to reset the network settings.
- Launch the Settings application on your Android phone.
- Then, go to the System settings option.
- Scroll down and select the Backup and reset option.
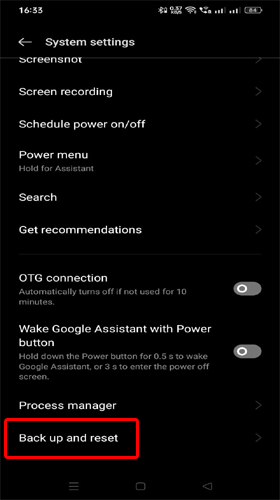
- Choose the Reset phone option and click on Reset network settings.

- Now, verify your identity by providing your password, PIN, face, or fingerprint.
- Once done with resetting, restart your phone and check for the issue.
If fixed, use the tool again to restore your backed-up data.
Final Words
So, these are the solutions that you can try to get out of the Verizon provisioning error on Android. I hope, the provided solutions resolved your problem and you are able to use your phone easily without any further issues.
In case of any queries or doubts, feel free to comment us on our official Twitter or Facebook pages.
James Leak is a technology expert and lives in New York. Previously, he was working on Symbian OS and was trying to solve many issues related to it. From childhood, he was very much interested in technology field and loves to write blogs related to Android and other OS. So he maintained that and currently, James is working for androiddata-recovery.com where he contribute several articles about errors/issues or data loss situation related to Android. He keeps daily updates on news or rumors or what is happening in this new technology world. Apart from blogging, he loves to travel, play games and reading books.