Switching from Android to iPhone can be exciting, but it may impose challenges when it comes to transferring data, especially your music library. So, today in our blog, we’re going to discuss how to transfer music from Android to iPhone for a seamless transition, allowing you to enjoy your favorite tunes on iPhone.
How to Transfer Music from Android to iPhone? – Enjoy Seamless Transition
Method 1: Use Bluetooth to Transfer Music- Manual Approach
The simple and widely used way of transferring your Android music library to your iPhone is via Bluetooth.
For this, you just need to:
- Turn on Bluetooth on both your Android and iPhone.
- Now, on Android, tap on iPhone model to pair.
- Confirm pairing by tapping Pair on iPhone, when prompted.
- When paired successfully, go to the Music folder on your Android device.
- Now, select the music that you want to transfer and tap on Send>>select Bluetooth.

- Accept receiving on iPhone, if prompted. Now, wait until the transfer gets completed.
- When done, check the transferred tunes on your iPhone.
Method 2: Move Android Music to iPhone Using iTunes- PC Approach
You can also add your Android music to iTunes to transfer it to your iPhone. For this, you’ll need a PC or laptop and a USB cable.
If you are handy with such things, proceed with the below instructions:
- Connect your Android phone to your PC/laptop via a USB cable.
- Now, select the Transfer Files option on your phone.
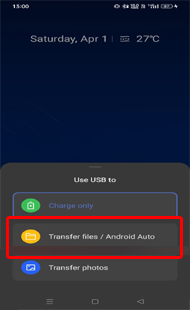
- When detected, transfer the Music files to the computer.
- Now, open iTunes on your system, tap on File>>Add File to Library or Add Folder to Library.
![]()
- Go to the File or Folder and hit the Open option or simply drag it to iTunes.
- After that, disconnect your Android phone and connect iPhone to your PC.
- Then, on the iTunes app, tap iPhone under the device list.
- Go to Music>>Select the box for Sync Tick the option box for items that you want to sync.
- When done with selecting, tap the Apply option.
![]()
- That’s it! You are now able to see Android music files on your iPhone.
Also Read: How to Transfer Music From iTunes To Android Phone?
Method 3: Use Music Streaming Apps to Transfer Music- Hassle-Free Approach
If you are trying to transfer your music streaming app’s tunes to your iPhone, the easy and hassle-free approach is to simply download the app on your iPhone.
When installed, log in with the same account that you used on your Android device and you are all set to access the music library of that app on your iPhone.
Method 4: Transfer Music Android to iPhone Using Android Transfer- 3rd Party Software
Apart from the above methods explained, you can also try 3rd party software for easy transfer of data between Android & iOS – Android Transfer.
It eases data transfer including music between Android to iOS devices or Android to computer. Apart from songs, data like contacts, photos, videos, SMS, calendars, notes, ringtones, can also be transferred using this tool.
This tool is easy to use and works on all Android devices. So, download the software and enjoy a seamless transition by following the simple guide here.
 btn_img
Note: It is recommended to download and use the software on your PC or laptop. It is because recovery of phone data on the phone itself is risky as you may end up losing all your data because of data overriding.
Also Read: How To Transfer Data From Android To iPhone?
Tips for Error-Free Transfer of Android Music to iPhone
While transferring music from an Android phone to an iPhone, take care of the below instructions to avoid any errors during data transfer.
- Backup music before transfer: Backing up your Android music transfer ensures your music library’s safety. In case, while transferring you come across any error that leads to data loss, with this backup file you’ll be ready to tackle the situation.
- Do not interrupt the transfer process: Once initialized transfer process, make sure not to interrupt it as this may lead to transfer errors or deletion of data.
- Ensure strong internet: In case of transferring data over Wi-Fi, make sure you are on stable internet to ensure smooth transfer without interruptions.
- Check Music file compatibility: Before transfer, check that the music file format is supportable on iPhone. If not, the transferred file may not be played on it.
- Ensure sufficient storage on iPhone: Make sure you have enough storage available on your iPhone for the transferred music files.
FAQs
Can I transfer my music wirelessly?
Yes, you can transfer your music wirelessly. We have covered some methods that requires no USB for data transfer. Consider them and easily move data between Android and iOS devices.
What if my iPhone device doesn't have enough storage for transferred files?
If your iPhone doesn’t have enough storage to accommodate the transferred music files, it’ll show you the storage-related errors or issues, leading to transfer failure.
Are there risks of data loss during the transfer process?
Well, data deletion is uncertain so it’s better to be prepared beforehand. Backup your data before initializing transfer process to tackle unwanted or unexpected data loss scenarios.
Can I transfer playlists along with individual songs?
Yes, playlist can also be transferred with individual songs. Follow the step-by-step instructions to transfer playlists of music streaming app frog on phone to another.
Is there a limit to the number of songs I can transfer at once?
The limit for transferring number of songs at once depends on the specific app you choose. For this, read the app’s specifications carefully and thoroughly.
Conclusion
Now that you have learned how to transfer music from Android to iPhone, indulge in the joy of listening to your favorite tunes on your new iPhone.
Happy listening on your new iPhone!
James Leak is a technology expert and lives in New York. Previously, he was working on Symbian OS and was trying to solve many issues related to it. From childhood, he was very much interested in technology field and loves to write blogs related to Android and other OS. So he maintained that and currently, James is working for androiddata-recovery.com where he contribute several articles about errors/issues or data loss situation related to Android. He keeps daily updates on news or rumors or what is happening in this new technology world. Apart from blogging, he loves to travel, play games and reading books.