If you are reading this tutorial then you must have come across Snapchat not showing messages issue on Android. If it is really so, then let me tell you that you have reached the correct place.
In this article, you’ll get various troubleshooting methods to solve Snapchat not working messages Android issue. But, before digging into the solutions, it is important to know the major reasons behind this problem.
So, let’s get started…
Why Is My Snapchat Not Showing Messages?
There are several possible reasons that can cause Snapchat not showing messages issue on android. Hence, I have suggested some of them in the below:
- If your device’s internet connection is disabled.
- If the Snapchat server is down.
- Not clearing the cache of the app for a long time.
- Using the older version of the Snapchat app.
- Something went wrong with the Snapchat app.
- And many others.
Hope these causes will help you to find the exact reason and address the “Snapchat not showing saved messages” issue ASAP.
How to Fix Snapchat Not Showing Messages Issue On Android?
In order to troubleshoot this issue, you need to follow each and every method provided in this blog.
List of Methods:
- Check the Internet Connection of Your Device
- Check the Snapchat Server Status
- Restart Your Android Phone to Fix Snapchat messages disappear Issue
- Close and Restart the Snapchat app
- Check the Snapchat Permissions
- Remove the Cache and Data of Snapchat App
- Install the Latest Version of the Snapchat App
- Uninstall & Re-Install the Snapchat App
Method #1: Check the Internet Connection of Your Device
This solution might sound silly, but it’s possible that your device’s internet connection is turned off because of this, your Snapchat not receiving messages.
So, the first thing you need to ensure is, whether your phone’s internet connection is enabled or not.
Also Read: Fix “Oops Something Went Wrong Snapchat” Error In 12 Ways
Method #2: Check the Snapchat Server Status
Sometimes, the “Snapchat not showing messages read” issue occurs due to server-related problems. So, the next thing you should consider is, whether your Snapchat server working properly or not.
If the server is down, you can’t do anything rather than waiting. However, you can check out the server status, by visiting the DownDetector website.
Method #3: Restart Your Android Phone to Fix the Snapchat messages disappear Issue
Another basic trick that you can try to deal with the problem is to restart your device.
Restarting the phone will close all the background running app and refreshes the device as well. And if your Snapchat messages disappear due to some minor problems or glitches, it will be solved by a simple reboot.
Long press the Power button of your Android device. Once the menu appears on the screen, leave the key. Now, choose and tap the Restart option.
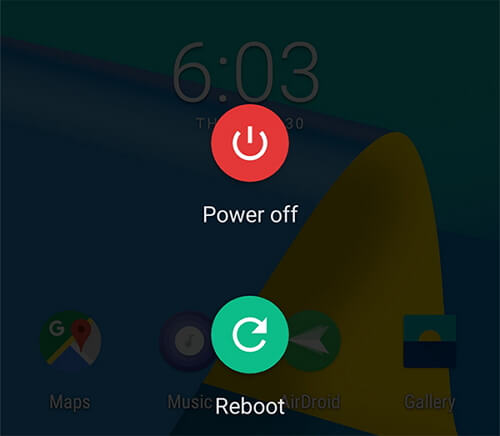
After a few seconds, your device will restart itself. Now, open your Snapchat app and check whether the problem is solved or not.
Method #4: Close and Restart the Snapchat app
If your Snapchat app is not showing messages even after restarting the device, simply exit from the app & restart it again.
Doing this will re-sync the local snaps or stories with a server and will also fix text not visible in the Snapchat problem on Android.
Also Read: Fix Snapchat “Could Not Connect” Error On Android
Method #5: Check the Snapchat Permissions
Disabling any of the Snapchat permissions will result in such sorts of errors or bugs on Snapchat. So, make sure that all the required Snapchat permission should be enabled.
So, here are the steps you need to follow to enable all the permissions asked by Snapchat.
- Head to your device’s “Settings” app.
- Then, tap on the App Management > App List.
- Now, choose the “Snapchat” app from the list of the installed apps & tap on “Permissions”.

- Here you’ll get all the permissions allowed to the Snapchat app.
- If all the Snapchat-required permissions are enabled on your device, then let it be.
Method #6: Remove the Cache and Data of the Snapchat App
It’s true that clearing out the app’s cache not only assists to resolve such kinds of issues but also improves your device performance. Therefore, you can also try this solution to fix Snapchat not showing new messages issue.
Follow the below-guided steps to know how to clear the Snapchat cache:
- Navigate to your phone’s Settings app.
- Then, choose “App Management” then “App List”.
- Now, find the Snapchat app from the list of the installed apps.
- Click on the “Storage Usage” option.
- Finally, touch the “Clear Cache” or “Clear Data” option.
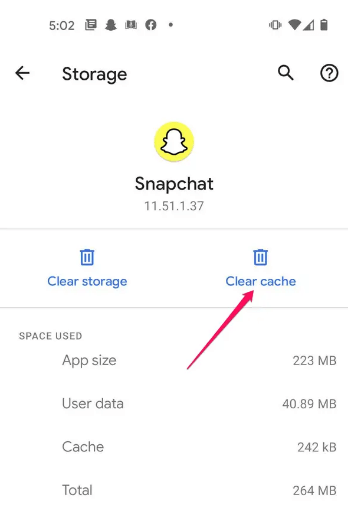
If the problem still persists even after clearing the cache of the app then try out the next method.
Also Read: Fix “Snapchat Won’t Load Snaps And Stories” On Android
Method #7: Install the Latest Version of the Snapchat App
Usually, running the older version of the apps is OK, but sometimes it might bring issues within the app especially when some important changes are being released.
Therefore, if you haven’t updated your Snapchat app for a long time then you need to update the app immediately.
How to update the Snapchat app on Android:
- Firstly, you need to open your Google Play Store on your phone.
- After that, look for the Snapchat app in the search box
- Now, simply choose the Snapchat app and tap on it
- If any update option is available here then the Update button

Method #8: Uninstall & Re-Install the Snapchat App
Sometimes, uninstalling and reinstalling the app helps to fix such kinds of issues and bugs. Hence, you may also try this method to get rid of Snapchat not showing new messages issue.
Here’s the process on how to uninstall and re-install the Snapchat app:
Keep pressing on the Snapchat app icon. Once, the options will appear, choose and hit the Uninstall option. Tap on the OK button to confirm the action & wait till the process is completed.
Open your Play Store app and look for the Snapchat app in the search box, Now, you can re-install the app again.

Also Read: How To Fix Snapchat Black Screen Issue On Android?
Conclusion
After reading this entire post, I am sure now you’ll be able to fix the Snapchat not showing messages Android issue. As you can see, here I have suggested 8 simple ways to troubleshoot this issue.
So, just keep on trying the given methods until and unless your problem is solved.
Thanks for reading this article!
James Leak is a technology expert and lives in New York. Previously, he was working on Symbian OS and was trying to solve many issues related to it. From childhood, he was very much interested in technology field and loves to write blogs related to Android and other OS. So he maintained that and currently, James is working for androiddata-recovery.com where he contribute several articles about errors/issues or data loss situation related to Android. He keeps daily updates on news or rumors or what is happening in this new technology world. Apart from blogging, he loves to travel, play games and reading books.