The camera is an integrated part of our device, playing an important role in executing tasks like capturing moments, attending meetings, or scanning QR codes. But it can be frustrating when your phone camera malfunctions. In this guide we’re going to discuss the problem of “can’t connect to the camera”, providing some expert insights and solutions to resolve it.

To fix Android issues and errors, we recommend this tool:
This effective tool can fix Android issues such as boot loop, black screen, bricked Android, etc. in no time. Just follow these 3 easy steps:
- Download this Android System Repair tool (for PC only) rated Excellent on Trustpilot.
- Launch the program and select brand, name, model, country/region, and carrier & click Next.
- Follow the on-screen instructions & wait for repair process to complete.
How To Fix Can’t Connect to the Camera on Android?
Solution 1: Restart Your Device
A simple device or camera glitch may sometimes hinder the camera from connecting. Here, a simple restart to your device can fix the error.
Rebooting your device will close all the running apps in the background and free up your RAM. So, begin the troubleshooting with this simple solution.
Here are the instructions to follow:
- Hold your phone’s Power button for a second.
- Once the power menu shows up, release the button and hit the Restart option.
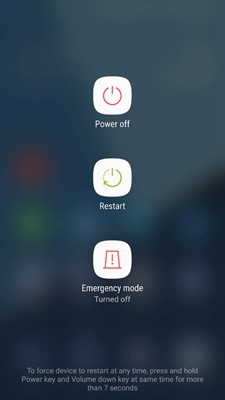
- Wait for your device to restart.
- Now, open the camera app and see if you can use it now.
Solution 2: Check for Any Hardware Damage
Any damage to the camera can also hinder it from working, resulting in can’t connect to the camera Android. So, if you suspect any hardware issue, like a faulty module or damaged camera, it is best to seek help from a professional technician or visit the nearest service center for repair.
Solution 3: Clear Camera App Cache & Data
The accumulated Camera app cache is interfering with it and causing this error. In such a case, clear the app cache timely to fix the error currently and to avoid the same in the future.
Steps to clear cache & data on the Camera app:
- Visit the Settings app on your phone.
- Then, select the Apps option and choose the Camera app on the list.
- Now, click on the Storage Usage option.
- Lastly, hit the Clear Cache option.

Also Read: How to Fix “Warning: Camera Failed” Error?
Solution 4: Grant Necessary Permissions to Camera
Missing necessary permissions on the Camera app can also be responsible for such error issues. So, granting them to the app can resolve the error issue and help it in smooth functioning.
Here are the steps to follow:
- Go to Settings and head to the Application Management section.
- Select the Camera on the app list.
- Now, tap on the Permissions category on the next screen.
- Here, check for the granted permissions. If any is missing allow the same.

Solution 5: Check for Interfering 3rd Party App in Safe mode
Sometimes, similar or interfering 3rd party apps can also be the reason why your phone camera isn’t working. Try rebooting your device into Safe mode and check if the problem is resolved.
In case the error disappears, find the troubling app and uninstall it. Follow the instructions below to do so:
- Hold the Power button of your phone for a second.
- Tap and hold down the Power-off option for a couple of seconds.
- Now, the Reboot to Safe mode prompt appears, tap OK on it to confirm.

- When in Safe mode, try opening the camera and taking the photo. If facing no issues or errors, find the app causing the error and uninstall it.
Solution 6: Update Camera App Version
The outdated Camera app version may have compatibility issues with your device which is why fails to work. Try fixing the error by updating your Camera app to the latest available version.
Steps to be followed:
- Go to the Play Store on your device.
- Click on the Profile icon and go for the Manage apps & device option.
- Navigate to the Updates available. Here look for the available update for Camera.
- If any is found, hit the Update button to install it.

Also Read: Unfortunately, Camera has Stopped Error
Solution 7: Try Camera App Alternatives
If you are facing continuous problems with your phone’s default Camera app, try its alternatives. Here, are some of the best Camera app alternatives for Android.
- Google Camera is also one of the most popular Camera apps so far. The app offers amazing features with different modes such as Portrait, Night Sight, video stabilization, and much more. You can also create time lapses and slow motion on the app.
- Camera FV-5 Lite is the best camera alternative app. It offers various adjust settings such as ISO, white balance, shutter speed, and focus for precise capture. Multiple shots with different exposures are also been offered by the app for HDR photography.
- Open Camera is another best Camera app for Android that offers advanced and more exquisite features to take snaps and record videos. The app offers multiple customizable setting options. Slow motion & time-lapse can also be easily done on this app.
Use the Android Repair Tool to Try Fixing Camera Issues
If your device is unable to connect to the camera due to a software glitch, in such a case, Android Repair Tool is the best option to go for.
This is a recommended professional tool that fixes any kind of errors and problems on Android phones. It can fix the issues with just a single click, without requiring you to go for any manual methods or steps.
The several problems that the tool can fix include Android setting has stopped, app crashing issue, problem parsing the package, phone won’t charge, black screen of death, and many more.
So, without wasting any more time, download it on your PC and get yourself out of any Android problem by following the steps in the guide.

Note: It is recommended to download and use the software on your PC or laptop only.
FAQs
Can I fix the Camera issues on my own?
Yes, you can troubleshoot the camera problems and errors on your phone by following the solutions in this guide. But if the problem is due to hardware malfunctioning, you need to consult the service center to get the hardware repaired.
How much does it cost to fix the damaged camera?
The cost of repairing or replacement can vary depending upon the damage and product used to replace it. But besides physical damage, if the problem is due to a manufacturing defect and your phone is under warranty, you’ll not be charged.
Verdict
It’s time for a wrap-up! Now, follow the outlined solutions in this guide and can’t connect to the camera error on Android. Also, in case of any further queries or doubts, feel free to ask us on Facebook and stay connected with us for our latest posts.
References:
- https://www.samsung.com/us/support/answer/ANS00077611/
- https://support.google.com/googleplay/answer/113412?hl=en
- https://support.google.com/android/answer/9431959?hl=en
- https://support.google.com/pixelphone/answer/2852139?hl=en#:~:text=Press%20your%20phone’s%20power%20button,phone%20starts%20in%20safe%20mode
James Leak is a technology expert and lives in New York. Previously, he was working on Symbian OS and was trying to solve many issues related to it. From childhood, he was very much interested in technology field and loves to write blogs related to Android and other OS. So he maintained that and currently, James is working for androiddata-recovery.com where he contribute several articles about errors/issues or data loss situation related to Android. He keeps daily updates on news or rumors or what is happening in this new technology world. Apart from blogging, he loves to travel, play games and reading books.