Summary: You might know about the normal steps on how to enable USB debugging on Android. But here, the scenario is different. We have done research and we have found that there are many Android users whose Android device’s screen gets locked and they cannot access their data stored within the device as well as they cannot connect their Android phone to PC. Hence, in this post you are going to learn about different solutions on how to enable USB debugging on locked Android phone.
Let us begin with real user example!
User Example – How to Turn ON USB Debugging on Screen Locked Android
How to enable USB Debugging in Android if forgotten pattern for screen-unlock?
I want to use some third party software to clear my device’s screen unlock pattern which I forgot. They require USB debugging enabled but I don’t have it enabled in my Android.
How do I turn on USB Debugging through Recovery mode, or Fastboot?
– Original Post from Android Enthusiasts Stack Exchange
In above example, user wants to unlock screen pattern lock (which he has forgotten) with the help of third party software. But third-party software asking him to enable USB debugging. And he does not have any idea on how to Turn ON USB debugging as his phone screen is locked.
Well, if you are also having similar type of problem on your Android device, then you have landed on the right webpage. Below you will find effective solutions to TURN ON USB Debugging on Locked Android phone.
But before that let us know what USB Debugging on Android means?
Additional Reading: How To Unlock Android Phone If It Gets Locked Due To Any Possible Reasons
What is USB Debugging Mode?
USB Debugging Mode is a mode that can be turned ON after connecting Android device directly to PC. Once, connected you can transfer files from your Android to computer. However, the main function of this mode is to establish connection between and Android device and a PC with Android SDK (software development kit). Android SDK is a software suite that made to help in the development of Android apps.
Please note that the main function about USB debugging is to establish a connection between PC and Android and it is ready to make deeper level actions.
Additional Reading: 9 Amazing Hidden Features of Samsung Galaxy: [Samsung Galaxy Tips & Tricks]
Solutions To Enable USB Debugging on Locked Android Phone
So, now coming back to the topic, here I am providing working solutions that will help you to enable usb debugging on locked Android phone – whether you have forgotten password, PIN, fingerprint or pattern lock.
Solution No. #1 – Remove Android Device’s Screen Lock First By Using Android Lock Screen Removal Software
If your phone is locked then you have to first follow the solutions mentioned here to get rid of locked screen – How to Remove or Bypass Android Screen Locks – [PIN, Pattern, Password or Fingerprints]
We recommend you to use Android Lock Screen Removal Software, because it is easy to understand and very fast and you don’t have to follow any hectic process.
Below find out the step-by-step guide on how to remove screen lock from Android.
Steps to Remove Locked Screen From Android Device
Part 1- Unlock Phone Screen Without Data Loss
Step 1 - Connect the Locked Android Phone to PC
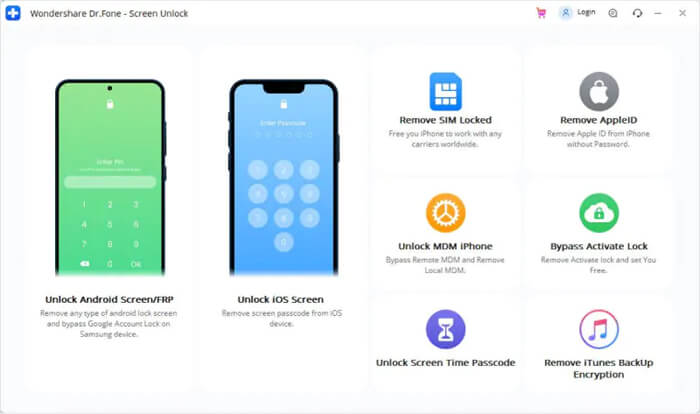
Launch Android Unlock Tool on your PC then choose 'Screen Unlock' option among various tools.
After that, connect your locked Android device to the PC with the help of USB cable. Next, click on 'Unlock Android Screen/FRP' option >> 'Unlock Android Screen' option on a program.
Step 2 - Select the Way to Unlock
Here, we will provide you 2 ways to bypass screen lock from almost all the Android devices. Select the 'Remove without Data loss' option to unlock part LG/Samsung devices without data loss.
Well, it is important to choose the correct device brand in order to unlock the screen lock. There you can see the list of all supported Android device models.

Step 3 - Get into the Download Mode
Follow the below steps to enter the Android mobile into the Download Mode.- Turn your phone ON.
- Then, press & hold Volume Down, Home button, Power button simultaneously.
- Now, press a Volume Up button to get into the Download Mode.

Step 4 - Download the Recovery Package
Once your device gets into download mode, it’ll start downloading a recovery package. You have to wait until the process completes.
Step 5 - Unlock Android Screen Lock without Data Loss
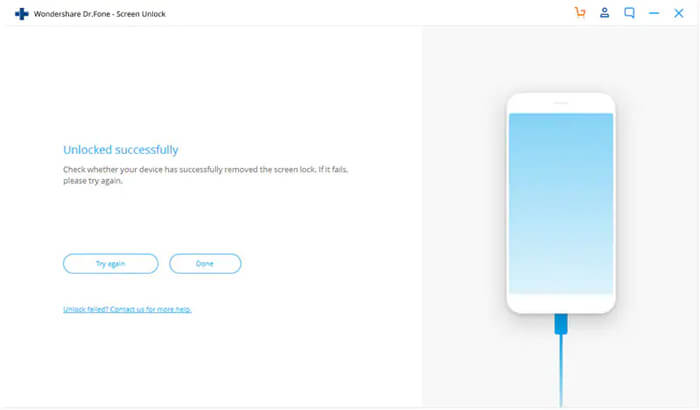
After completing a recovery package downloading process, click on 'Remove Now'. Doing this will not harm any data saved within your device.
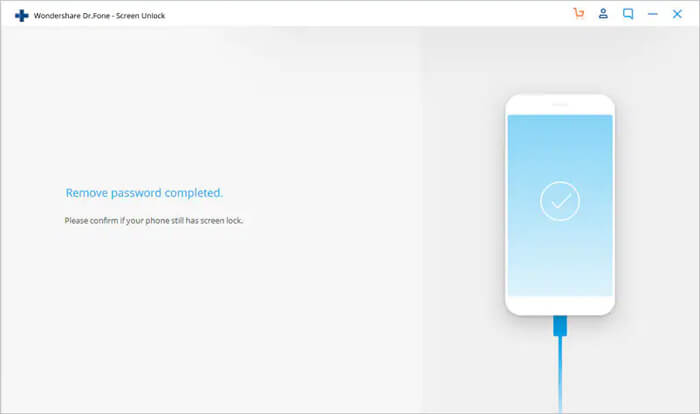
When the whole progress gets finished, you can now access your phone without entering any PIN or password.
Part 2- Remove Screen Lock of Most Android Brands
In the list of devices, if you can’t find your phone model in the device list, select '100% Remove Screen Lock' option to unlock your Android phone. Here’s how:
Please Note: This mode will erase all your device stuff.
Step 1 - Choose ‘Unlock Android Screen’ Option
Here, you will see 2 options, but you will have to choose 'Unlock Android Screen' option.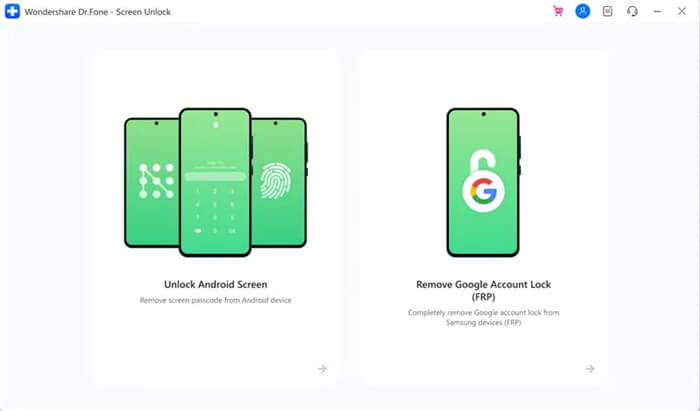
Step 2 - Select the Way to Unlock
Now, here you will also get two options to bypass your Android device screen lock for most of the brands, like Nokia, LG, Samsung, OPPO, Vivo, Motorola, etc. Then, click on '100% Remove Screen Lock' option.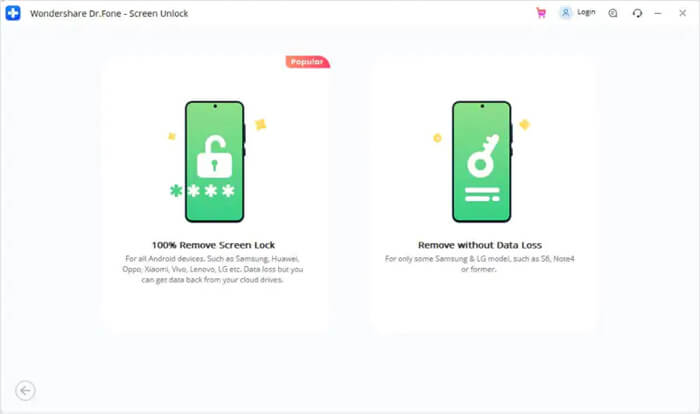
Ensure to choose the accurate device brand to complete the screen lock removal process successfully.

Step 3 - Get into the Recovery Mode.
Follow the program steps to get your phone into the Recovery Mode. Now, here we will take the example of Samsung phone (Processes may differ according to different brands/models):For Samsung Device with Bixby:
- Switch of your phone and ensure that it is connected to a PC.
- Next, press & hold the Volume Up, Bixby, Power Button simultaneously.
- Now, release all the buttons once Samsung logo seems.

For Samsung Device without Bixby:
- Switch of your phone and ensure that it is connected to a PC.
- Press & hold the Volume Up + Power Button together for 6-8 seconds.
- Now, release the buttons once Samsung logo seems and wait for some time.

For Samsung Device with a Home Button
- Switch of your phone and ensure that it is connected to a PC.
- Press & hold the Volume Up, Home Button, Power button simultaneously.
- Release all the buttons once Samsung logo seems and wait for some time.

Step 4 - Steps to Wipe Away Cache Partition
Once a Recovery mode is initiated, follow the onscreen instructions in order to wipe out all your device settings.- Simply, press a Volume Button in order to choose 'Wipe data/factory reset' option & then press a Power Button to proceed.
- Then, enter a screen above, and press a Volume Button. Choose 'Yes' >> press a Power Button in order to confirm.
- After this, press the 'Wipe Cache Partition' >> select 'Yes' in order to confirm.
- Lastly, choose the 'reboot system now' option & press a Power Button in order to confirm. Now, you have to wait until your device to restart.

You Might Also Be Interested In:
- How to Recover Data From Water Damaged Android Phone in Easy Way
- How to Fix Boot Loop Issue on Android without Losing Data
- Solved: Samsung Galaxy S6/S6 Edge Won’t Turn On Issue
- Working Solutions To Fix “Unfortunately, Messaging Has Stopped” Error on Android
Steps To Enable USB Debugging on Android [Phone/Tablet]
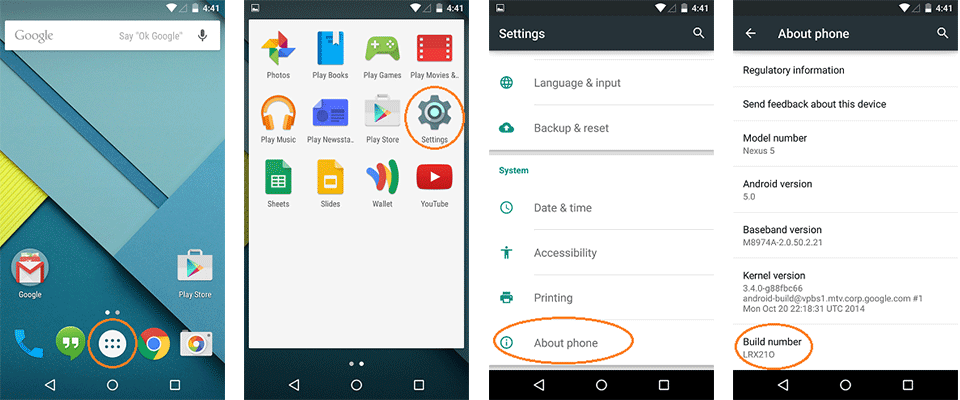
And thereafter, when you have successfully able to bypass screen lock you can go into Setting>About Phone (or About Tablet for tablet users)>Build Number.
Tap on Build Number for 7 Times (applicable for Android 4.2 and higher OS version)
When you are done, you’ll see the message “You are now a developer!“
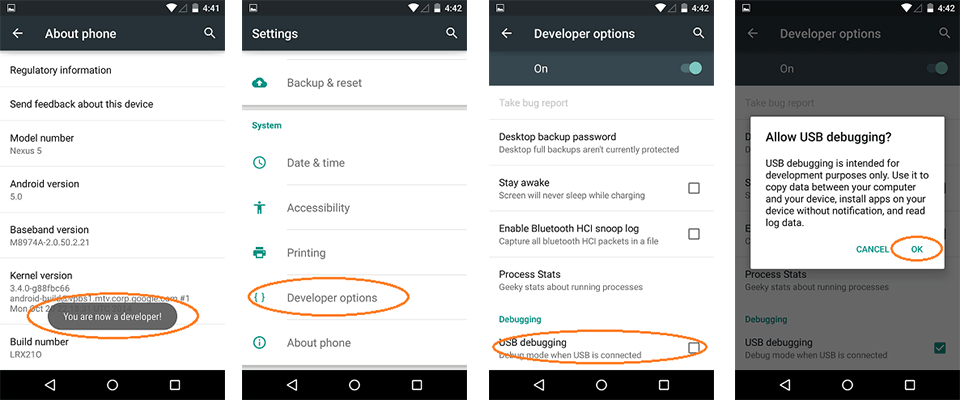
Now go back to Setting you will see the Developer Options – tap on it.
You will see the option of USB Debugging – just check mark the box.
A confirmation dialogue box will appear asking the confirmation – simply tap on OK.
That’s All!
Additional Reading: 3 Effective Ways to Unlock Android Sim Lock Without Code
Solution No. #2 – Enable USB Debugging By Entering Into Recovery Mode
This is another solution, in which you have to enter into recovery mode and perform wipe data/factory reset process in order to get rid of locked screen on Android device.
Below find out the steps how to wipe data/factory reset:
- Switch OFF your Android phone.
- Now press following key combination to get into recovery mode. The key combination differs from phone to phone. One of the popular combinations is “Power Button + Volume Up Button + Volume Down Button”, but you must check online which key combination work for your phone model.
- The Android bootloader menu will open. Select the “Recovery mode” and press the power button to enter into recovery mode.
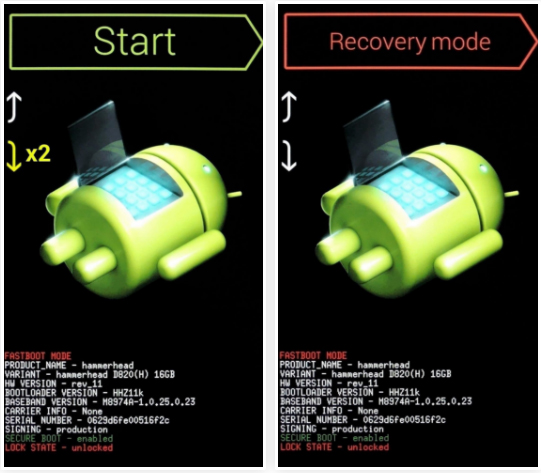
- Once, you enter into recovery mode, you can use Volume down button to scroll down and press Power button to select “Wipe Data/Factory Reset” option.
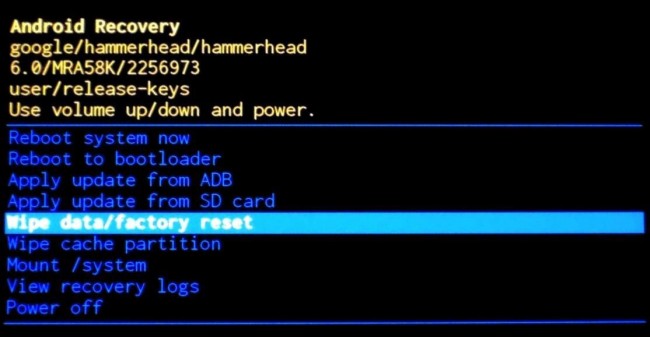
- Once, you confirm the wipe data/factory reset, your device will start the process.
- Once, the process gets complete, reboot your device.
After performing the above process, you will be able to Turn On your Android phone normally and you do not have to enter any password, pin, pattern lock or fingerprint lock.
After this you can follow the solution 1 mentioned above to Enable USB debugging on your Android phone or tablet.
Additional Reading: How To Fix “Unfortunately App has Stopped” Error in Android Without losing data
Things To Consider While Performing Solution 2
I would suggest this solution as a last option, because performing wipe data/factory reset deletes entire data stored within the phone. So, if you are able, then it is suggested that you must backup data to PC. But in case if you have forgotten to take backup – then in such situation you can use Android Data Recovery Software designed to retrieve files from Android after Wipe Data/Factory Reset process.
Below Download Android Data Recovery Software:
 btn_img
Note: It is recommended to download and use the software on your PC or laptop. It is because recovery of phone data on the phone itself is risky as you may end up losing all your data because of data overriding.
Bonus Tip: How to Enable USB Debugging on Android Whose Screen is Broken or Damaged
This is the extra bonus tips that I have though would be helpful for those users whose Android screen has got smashed, damaged, broken or touch is not working and they want to enable USB debugging.
This is one of the most effective and best way to enable USB debugging on Android device whose screen is damaged or broken.
But, you have to first purchase USB mouse and OTG cable.
Note: Please make sure that your phone support OTG cable for connection. Also charge your phone to full capacity because mouse will drain out the battery.
Now connect your Android Phone and USB mouse with the help of OTG Cable.

Once, connected you can now use the mouse to make action on the phone and follow the steps mentioned above in solution 1 i.e. – Steps To Enable USB Debugging on Android [Phone/Tablet].
Additional Reading: How to Recover Data from Screen Broken Android Phone/Tablet
However, if your phone screen is black, then you can mirror Android screen on a computer.
Video Tutorial: How to Enable USB Debugging on Locked Android Phone
FAQ (Frequently Asked Questions)
Can I Enable USB debugging using ADB?
There are step by step guide to enable USB debugging using ADB command. Here are the steps to follow: First, you should connect your device using USB to use ADB. Then enable USB debugging in system settings that is under Developer options. If your phone is running on Android 4.2 or higher, then you must know that the Developer option is hidden by default. So if you want to enable it then go to Settings > About Phone and click on Build number seven times
How do I enable USB debugging on Android remotely?
Here are the steps to enable USB debugging on Android remotely:
- First, open Developer option on Android phone
- Now choose Enable USB debugging
- Now on the development machine, open Chrome
- Then open DevTools
- Here, click on Main Menu
- After that, click on the Settings tab
- Now, ensure Discover USB devices checkbox is enabled
Can ADB work without USB debugging?
When you use ADB then USB debugging is not necessary to enable as this only affects ADB access when Android OS is running. Remember that ADB is enabled automatically while you use Apply update from ADB option in stock recovery regardless of whether its active or not in Settings.
Is it safe to enable USB debugging?
Yes, it is safe to enable USB debugging but there is a risk too. Especially when you plug your phone into public charging port then it can create problems. This is because if someone has access to that port then they can steal some confidential data or information from a device or even may put some harmful apps into it.
Conclusion
I am very sure that above mentioned solutions have definitely helped you in enabling the USB debugging on locked Android phone and tablet. And you should not get worried about the locked screen as there are various solutions available that would help you in removing the screen lock of Android device and one of the best software is Android Lock Screen Removal Tool and after unlocking the phone you can simply follow the normal steps to enable USB debugging on Android.
If you have found this article useful and helpful, then please do not forget to share it.
Also like and follow us on Facebook, G+, Twitter and Pinterest to get latest updates.

James Leak is a technology expert and lives in New York. Previously, he was working on Symbian OS and was trying to solve many issues related to it. From childhood, he was very much interested in technology field and loves to write blogs related to Android and other OS. So he maintained that and currently, James is working for androiddata-recovery.com where he contribute several articles about errors/issues or data loss situation related to Android. He keeps daily updates on news or rumors or what is happening in this new technology world. Apart from blogging, he loves to travel, play games and reading books.